Microbiology
Dyes or stains may be divided
into two groups: basic and acidic.
Basic dye: If
the color portion of the dye resides in the positive ion, as in
the above case, it is called a basic dye(examples:
methylene blue, crystal violet, safranin).
when using a basic dye, the
positively charged color portion of the stain combines with the negatively
charged bacterial cytoplasm (opposite charges attract) and the organism becomes
directly stained (see Fig. 1).
Acidic dye: If
the color portion is in the negatively charged ion, it is
called an acidic dye (examples: nigrosin, congo red).
An acidic dye, due to
its chemical nature, reacts differently. Since the color portion of the dye is
on the negative ion, it will not readily combine with the negatively charged
bacterial cytoplasm (like charges repel). Instead, it forms a deposit around
the organism, leaving the organism itself colorless (see Fig. 1). Since the organism is seen indirectly, this type
of staining is called indirect or negative, and is used to get a more accurate view of
bacterial size, shapes, and arrangements.
Direct Stain using a Basic Dye
In direct staining, the positively charged color portion of the basic dye combines with the negatively charged bacterium, and the organism becomes directly stained.
Organisms
Your pure cultures of Staphylococcus epidermidis (coccus with staphylococcus arrangement) or Micrococcus luteus (coccus with a tetrad or a sarcina arrangement) and Escherichia coli (small bacillus) or Enterobacter aerogenes (small bacillus).
Procedure
1. Heat-fix
a smear of either Escherichia coli or Enterobacter
aerogenes as follows:
a. Using the
dropper bottle of distilled water found in your staining rack, place a small
drop of water on a clean slide by touching the dropper to the slide.
b. Aseptically
remove a small amount of the culture from the agar surface
c. Burn the
remaining bacteria off the loop. (If too much culture is added to the water,
you will not see stained individual bacteria.)
d. Using the
loop, spread the suspension over the entire slide to form a thin film.
e. Allow
this thin suspension to completely air dry.
f. Pass the
slide (film-side up) through the flame of the bunsen burner 3 or 4 times to heat-fix.
2. Place the
slide on a staining tray and cover the entire film with safranin. Stain for 1
minute.
3. Pick up
the slide by one end and hold it at an angle over the staining tray. Using the
wash bottle on the bench top, gently wash off the excess safranin from the
slide. Also wash off any stain that got on the bottom of the slide.
4. Use a
book of blotting paper to blot the slide dry. Observe using oil immersion
microscopy.
5. Prepare a
second direct, this time using either Staphylococcus epidermidis or Micrococcus
luteus as the organism.
a. Heat-fix
a smear of the Micrococcus luteus or Staphylococcus
epidermidis by following the directions under step 1.
b. Stain
with methylene blue for 1 minute.
c. Wash off
the excess methylene blue with water.
d. Blot dry
and observe using oil immersion microscopy.
6. Prepare a
third slide of the normal flora and cells of your mouth.
a. Using a
sterile cotton swab, vigorously scrape the inside of your mouth and gums.
b. Rub the
swab over the slide (do not use water), air dry, and heat-fix.
c. Stain
with crystal violet for 30 seconds.
d. Wash off
the excess crystal violet with water.
e. Blot dry
and observe. Find epithelial cells using your 10X objective, center them in the
field, and witch to oil immersion to observe the normal flora bacteria on and
around your epithelial cells.
Indirect
Stain using an Acidic Dye
In negative staining, the negatively charged color portion of the acidic dye is repelled by the negatively charged bacterial cell. Therefore, the background will be stained and the cell will remain colorless.
Organism
Your pure culture of Staphylococcus epidermidis or Micrococcus luteus.
Procedure
1. Place a
small drop of nigrosin on a clean slide.
2. Aseptically
add a small amount of Staphylococcus epidermidis or Micrococcus luteus to
the dye and mix gently with the loopUsing the edge of another slide, spread the
mixture with varying pressure across the slide so that there are alternating
light and dark areas. Make sure the dye is not too thick or you will not see
the bacteria!
3. Let the
film of dyed bacteria air dry completely on the slide. Do not heatfix and do
not wash off the dye.
4. Observe
using oil immersion microscopy. Find an area that has neither too much nor too
little dye (an area that appears light purple where the light comes through the
slide). If the dye is too thick, not enough light will pass through; if the dye
is too thin, the background will be too light for sufficient contrast.
Procedure of Gram’s Staining Technique:
1.Fixation of clinical
materials to the surface
of the microscope slide either by heating or by using methanol. (# Methanol
fixation preserves the morphology of host cells, as well as bacteria, and is
especially useful for examining bloody specimen material).

An easy way to
remember the steps of the Gram stain
2.
Application
of the primary stain (crystal violet). Crystal violet stains all cells blue/purple
3.
Application
of mordant: The iodine
solution (mordant) is added to form a crystal violet iodine (CV-I) complex; all
cells continue to appear blue.
4.
Decolorization
step: The decolorization
step distinguishes gram-positive from gram-negative cells.
The organic solvent such as acetone or ethanol, extracts the blue dye complex from the lipid-rich, thin walled gram negative bacteria to a greater degree than from the lipid poor, thick walled, gram-positive bacteria. The gram negative bacteria appear colorless and gram positive bacteria remain blue.
The organic solvent such as acetone or ethanol, extracts the blue dye complex from the lipid-rich, thin walled gram negative bacteria to a greater degree than from the lipid poor, thick walled, gram-positive bacteria. The gram negative bacteria appear colorless and gram positive bacteria remain blue.
5.
Application
of counter stain (safranin): The red dye safranin stains the decolorized gram-negative
cells red/pink; the gram-positive bacteria remain blue.
Principle of
Gram Staining
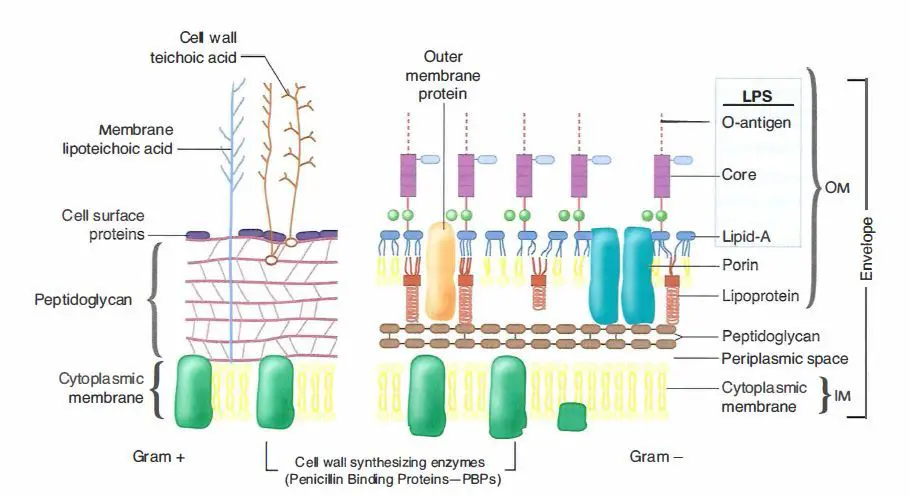
Image 2: Cell wall of Gram Positive and
Gram Negative Bacteria
The
differences in cell wall composition of Gram positive and Gram negative
bacteria accounts for the Gram staining differences. Gram positive cell wall
contain thick layer of peptidoglycan with numerous teichoic acid cross linking
which resists the decolorization.
In aqueous solutions crystal violet
dissociates into CV+ and Cl – ions that penetrate through the wall and membrane
of both Gram-positive and Gram-negative cells. The CV+ interacts with negatively
charged components of bacterial cells, staining the cells purple.
When added, iodine (I- or I3-)
interacts with CV+ to form large crystal violet iodine (CV-I) complexes
within the cytoplasm and outer layers of the cell.
The decolorizing agent, (ethanol or
an ethanol and acetone solution), interacts with the lipids of the membranes of
both gram-positive and gram negative bacteria.
The
outer membrane of the Gram-negative cell (lipopolysaccharide layer)
is lost from the cell, leaving the peptidoglycan layer exposed.
Gram-negative cells have thin layers of peptidoglycan, one to three layers deep
with a slightly different structure than the peptidoglycan of gram-positive
cells. With ethanol treatment, gram-negative cell walls become leaky and allow
the large CV-I complexes to be washed from the cell.
The
highly cross-linked and multi-layered peptidoglycan of the gram-positive cell is
dehydrated by the addition of ethanol. The multi-layered nature of the peptidoglycan
along with the dehydration from the ethanol
treatment traps the large CV-I complexes within the cell.
After
decolorization, the gram-positive cell remains purple in color, whereas the
gram-negative cell loses the purple color and is only revealed when the
counterstain, the positively charged dye safranin, is added.
Acid-Fast Stain-
Principle, Procedure, Interpretation and Examples
It is the differential staining techniques which was first
developed by Ziehl and later on modified by Neelsen. So this method is also
called Ziehl-Neelsen stainingtechniques. Neelsen in 1883
used Ziehl’s carbol-fuchsin and heat then decolorized with an acid alcohol, and
counter stained with methylene blue. Thus Ziehl-Neelsen staining techniques was
developed.
The main aim of this staining is to differentiate bacteria into
acid fast group and non-acid fast groups.
This method is used for those microorganisms which are not
staining by simple or Gram staining method, particularly the member of genus Mycobacterium,
are resistant and can only be visualized by acid-fast staining.
Principle of Acid-Fast
Stain
When the smear is stained with carbol fuchsin, it solubilizes the
lipoidal material present in the Mycobacterial cell wall but by the application
of heat, carbol fuchsin further penetrates through lipoidal wall and enters
into cytoplasm. Then after all cell appears red. Then the smear is decolorized
with decolorizing agent (3% HCL in 95% alcohol) but the acid fast cells are
resistant due to the presence of large amount of lipoidal material in their
cell wall which prevents the penetration of decolorizing solution. The non-acid
fast organism lack the lipoidal material in their cell wall due to which they
are easily decolorized, leaving the cells colorless. Then the smear is stained
with counterstain, methylene blue. Only decolorized cells absorb the counter
stain and take its color and appears blue while acid-fast cells retain the red
color.
Procedure of Acid-Fast
Stain
1.
Prepare bacterial smear
on clean and grease free slide, using sterile technique.
2.
Allow smear to air dry
and then heat fix.
Alcohol-fixation: This is recommended when the smear has not been prepared from sodium hypochlorite (bleach) treated sputum and will not be stained immediately. M. tuberculosis is killed by bleach and during the staining process. Heat-fixation of untreated sputum will not kill M. tuberculosis whereas alcohol-fixation is bactericidal.
Alcohol-fixation: This is recommended when the smear has not been prepared from sodium hypochlorite (bleach) treated sputum and will not be stained immediately. M. tuberculosis is killed by bleach and during the staining process. Heat-fixation of untreated sputum will not kill M. tuberculosis whereas alcohol-fixation is bactericidal.
3.
Cover the smear with
carbol fuchsin stain.
4.
Heat the stain until
vapour just begins to rise (i.e. about 60 [1]C). Do not overheat. Allow the heated
stain to remain on the slide for 5 minutes.
Heating the stain: Great care must be taken when heating the carbol fuchsin especially if staining is carried out over a tray or other container in which highly flammable chemicals have collected from previous staining. Only a small flame should be applied under the slides using an ignited swab previously dampened with a few drops of acid alcohol or 70% v/v ethanol or methanol. Do not use a large ethanol soaked swab because this is a fire risk.
Heating the stain: Great care must be taken when heating the carbol fuchsin especially if staining is carried out over a tray or other container in which highly flammable chemicals have collected from previous staining. Only a small flame should be applied under the slides using an ignited swab previously dampened with a few drops of acid alcohol or 70% v/v ethanol or methanol. Do not use a large ethanol soaked swab because this is a fire risk.
5.
Wash off the stain with
clean water.
Note: When the tap water is not clean, wash the smear with filtered water or clean boiled rainwater.
Note: When the tap water is not clean, wash the smear with filtered water or clean boiled rainwater.
6.
Cover the smear with 3%
v/v acid alcohol for 5 minutes or until the smear is sufficiently
decolorized, i.e. pale pink.
Caution: Acid alcohol is flammable, therefore use it with care well away from an open flame.
Caution: Acid alcohol is flammable, therefore use it with care well away from an open flame.
7.
Wash well with clean
water.
8.
Cover the smear with
malachite green stain for 1–2 minutes, using the longer time when
the smear is thin.
9.
Wash off the stain with
clean water.
10.
Wipe the back of the
slide clean, and place it in a draining rack for the smear to air-dry (do
not blot dry).
11.
Examine the smear
microscopically, using the 100 X oil immersion objective.
Comments
Post a Comment